 记录Centos7安装配置LAMP以及创建虚拟主机(多站点)过程
环境:
Virtualbox 最小化安装 Centos 7
timedatectl set-timezone Asia/Hong_Kong
timedatectl
vi /etc/selinux/config
修改如下内容:
SELINUX=disabled
#SELINUXTYPE=targeted  //加#注释
重启系统
shutdown -r now
Centos最小化安装时,若没有设置网卡随系统启动而开启,需要修改如下:
vi /etc/sysconfig/network-scripts/ifcfg-eth0 //virtualbox下ifcfg-enp0s3
输出如下:
TYPE=Ethernet
BOOTPROTO=dhcp
DEFROUTE=yes
PEERDNS=yes
PEERROUTES=yes
IPV4_FAILURE_FATAL=no
IPV6INIT=yes
IPV6_AUTOCONF=yes
IPV6_DEFROUTE=yes
IPV6_PEERDNS=yes
IPV6_PEERROUTES=yes
IPV6_FAILURE_FATAL=no
NAME=enp0s3
UUID=60a5374d-3ac3-4609-8816-26cc05816ecb
DEVICE=enp0s3
ONBOOT=no               // 修改为yes,开机自动启动
重启网络:
service network restart
在没有Gui的Centos下,应有一款看网站的命令行浏览工具,例如links
yum install links
yum install httpd
添加Apache服务到系统层使其随系统自动启动
systemctl start httpd.service
systemctl enable httpd.service
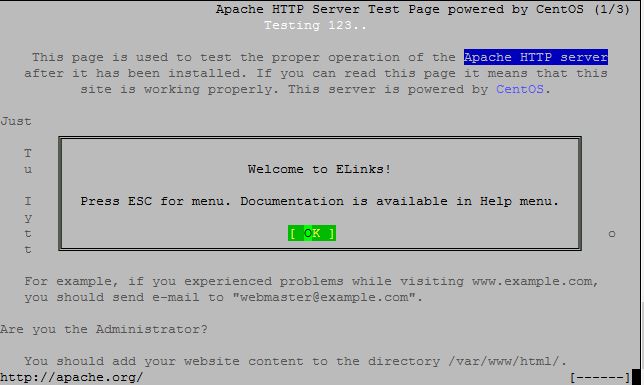
用links命令行工具验证Apache Http服务器
links 127.0.0.1
输出:
备份配置文件
mkdir ~/confbak
cp -R /etc/httpd ~/confbak
默认情况下,位于 /etc/httpd/ 目录下的所有以 .conf 结尾的文件都会被读取,并按照字母顺序加载做为 Apache 的配置,所以需要在 /etc/httpd/conf.d/ 下新建一个配置文件 vhost.conf 来配置虚拟主机。可以参考官网vhost.conf 配置实例。
vi /etc/httpd/conf.d/vhost.conf
说明:若同一个IP有不同的主机名,通过IP访问时,配置文件中哪个主机名在前就显示哪个。例如如下配置文件中,先访问www.test.com。
vhost.conf内容:
<VirtualHost *:80>
    ServerName www.test.com
    ServerAlias test.com
    DocumentRoot /srv/www/test.com
<Directory "/srv/www/test.com/">
    Options FollowSymLinks
    AllowOverride All
    Require all granted
</Directory>
ErrorLog /srv/www/testlogs/error.log
CustomLog /srv/www/testlogs/access.log combined
</VirtualHost>

<VirtualHost *:80>
    ServerName www.test2.com
    ServerAlias test2.com
    DocumentRoot /srv/www/test2.com
<Directory "/srv/www/test2.com/">
    Options FollowSymLinks
    AllowOverride All
    Require all granted
</Directory>
ErrorLog /srv/www/test2logs/error.log
CustomLog /srv/www/test2logs/access.log combined
</VirtualHost>
解析主机名
修改/etc/hosts
vi /etc/hosts
添加
127.0.0.1 www.test.com www.test2.com test.com test2.com
创建各个虚拟主机文件夹
mkdir /srv/www/test.com -p
mkdir /srv/www/test2.com -p
mkdir /srv/www/testlogs -p
mkdir /srv/www/test2logs -p
检查语法错误,重启httpd服务
httpd -t
输出 Syntax OK 则无错误,若出现错误按提示修改配置文件即可。
重启httpd服务
systemctl restart httpd
将http服务加入防火墙以允许外部访问(若为CentOS6,防火墙为iptables,配置方法见文章最后)
firewall-cmd --add-service=http --permanent
-permenent参数表示这是一条永久防火墙规则,如果不加则重启系统后就没有这条规则了
重启Firewalld使该规则生效
systemctl restart firewalld
加入后的防火墙规则为:
# firewall-cmd --list-all
public (default, active)
    interfaces: enp0s3
    sources:
    services: dhcpv6-client http ssh
    ports:
    masquerade: no
    forward-ports:
    icmp-blocks:
    rich rules:
本机测试:
links www.test.com
links www.test2.com
局域网内PC测试:
浏览器打开 192.168.1.111
修改/etc/hosts加入如下内容
192.168.1.111 www.test.com www.test2.com test.com test2.com
浏览器打开test.com test2.com
vhost.conf内容:
<VirtualHost 192.168.1.220:80>     //设置ip
    ServerName www.test.com
    ServerAlias test.com
    DocumentRoot /srv/www/test.com
<Directory "/srv/www/test.com/">
    Options FollowSymLinks
    AllowOverride All
    Require all granted
</Directory>
ErrorLog /srv/www/testlogs/error.log
CustomLog /srv/www/testlogs/access.log combined
</VirtualHost>

<VirtualHost 192.168.1.221:80>      //设置ip
    ServerName www.test2.com
    ServerAlias test2.com
    DocumentRoot /srv/www/test2.com
<Directory "/srv/www/test2.com/">
    Options FollowSymLinks
    AllowOverride All
    Require all granted
</Directory>
ErrorLog /srv/www/test2logs/error.log
CustomLog /srv/www/test2logs/access.log combined
</VirtualHost>
查看是否语法错误,重启httpd:
httpd -t
stytemctl restart httpd
添加ip并查看:
ip addr add 192.168.1.220/24 dev enp0s3
ip addr add 192.168.1.221/24 dev enp0s3
ip addr show
输出如下:
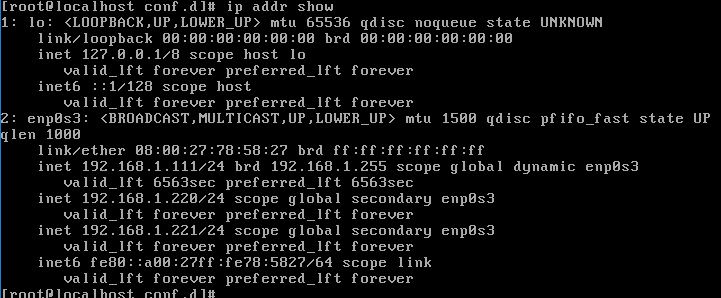
测试成功。
vhost.conf内容:
<VirtualHost *:80>     //不同于基于域名
    ServerName www.test.com
    ServerAlias test.com
    DocumentRoot /srv/www/test.com
<Directory "/srv/www/test.com/">
    Options FollowSymLinks
    AllowOverride All
    Require all granted
</Directory>
ErrorLog /srv/www/testlogs/error.log
CustomLog /srv/www/testlogs/access.log combined
</VirtualHost>

<VirtualHost *:8080>      //不同于基于域名
    ServerName www.test2.com
    ServerAlias test2.com
    DocumentRoot /srv/www/test2.com
<Directory "/srv/www/test2.com/">
    Options FollowSymLinks
    AllowOverride All
    Require all granted
</Directory>
ErrorLog /srv/www/test2logs/error.log
CustomLog /srv/www/test2logs/access.log combined
</VirtualHost>
启用8080端口
编辑主配置文件监听端口,添加8080端口:
vi /etc/httpd/conf/httpd.conf

添加:

Listen 8080
防火墙开放8080端口:
firewall-cmd --add-port=8080/tcp
重启服务器:
systemctl restart httpd
测试成功。
至此apache配置完成,默认使用基于域名的虚拟主机。
另外:有关firewall博主第一次接触,会单写日志进行学习测试。
LAMP架构盛极一时,这离不开MySQL的免费与易用,但是在Oracle收购了Sun之后,很多公司开始担忧MySQL的开源前景,而最近Oracle进一步闭源的举措更是让人难以安心,众多互联网公司纷纷开始寻求MySQL的替代方案。
MySQL之父Widenius先生离开了Sun之后,觉得依靠Sun/Oracle来发展MySQL,实在很不靠谱,于是决定另开分支,这个分支的名字叫做MariaDB。
MariaDB跟MySQL在绝大多数方面是兼容的,对于开发者来说,几乎感觉不到任何不同。目前MariaDB是发展最快的MySQL分支版本,新版本发布速度已经超过了Oracle官方的MySQL版本。
所以数据库我们选择 MariaDB。
yum install mariadb-server mariadb
启动 MariaDB 并配置它开机时自动启动。
systemctl start mariadb.service
systemctl enable mariadb.service
查看内存占用情况
top -u mysql
停止/重启或停用 mariadb 服务的一些指令
停止
sudo systemctl stop mariadb
重启
sudo systemctl restart mariadb
禁用
sudo systemctl disable mariadb
检查 mariadb 服务器 是否正在运行
sudo systemctl is-active mariadb
安全配置 MariaDB
mysql_secure_installation
这里需要配置 mysql 根用户和密码、清除其他用户、清除不需要的数据库等。输出类似于下面的执行过程,其中需要我们从键盘输入的内容已注释:
# /usr/bin/mysql_secure_installation
/usr/bin/mysql_secure_installation: line 379: find_mysql_client: command not found

NOTE: RUNNING ALL PARTS OF THIS SCRIPT IS RECOMMENDED FOR ALL MariaDB
SERVERS IN PRODUCTION USE! PLEASE READ EACH STEP CAREFULLY!

In order to log into MariaDB to secure it, we'll need the current
password for the root user. If you've just installed MariaDB, and
you haven't set the root password yet, the password will be blank,
so you should just press enter here.

Enter current password for root (enter for none):   //这里直接回车,这里可不是 Linux root 用户,而是 MariaDB 数据库的 root 用户
OK, successfully used password, moving on...

Setting the root password ensures that nobody can log into the MariaDB
root user without the proper authorisation.

Set root password? [Y/n] y
New password:                //输入你的数据库root用户密码
Re-enter new password:       //再输入一遍
Password updated successfully!
Reloading privilege tables..
... Success!
By default, a MariaDB installation has an anonymous user, allowing anyone
to log into MariaDB without having to have a user account created for
them. This is intended only for testing, and to make the installation
go a bit smoother. You should remove them before moving into a
production environment.

Remove anonymous users? [Y/n] y
... Success!

Normally, root should only be allowed to connect from 'localhost'. This
ensures that someone cannot guess at the root password from the network.

Disallow root login remotely? [Y/n] y
... Success!

By default, MariaDB comes with a database named 'test' that anyone can
access. This is also intended only for testing, and should be removed
before moving into a production environment.

Remove test database and access to it? [Y/n] y
- Dropping test database...
... Success!
- Removing privileges on test database...
... Success!

Reloading the privilege tables will ensure that all changes made so far
will take effect immediately.

Reload privilege tables now? [Y/n] y
... Success!

Cleaning up...

All done! If you've completed all of the above steps, your MariaDB
installation should now be secure.

Thanks for using MariaDB!
然后使用 MySQL 的 root 帐户(不同于 Linux 的 root 帐户,刚才设置密码了)登录进去
mysql -u root -p
输入密码后回车,下面是输出示例,可以看到命令提示符变为 MariaDB [(none)]>
# mysql -u root -p
Enter password:
Welcome to the MariaDB monitor. Commands end with ; or \g.
Your MariaDB connection id is 10
Server version: 5.5.44-MariaDB MariaDB Server

Copyright (c) 2000, 2015, Oracle, Monty Program Ab and others.

Type 'help;' or '\h' for help. Type '\c' to clear the current input statement.

MariaDB [(none)]>
PHP是用于web基础服务的服务器端脚本语言。它也经常被用作通用编程语言。
yum install php

//根据CMS需求安装模块 常用的如:php-mysql php-pdo php-gd php-mbstring

yum install php-gd php-ldap php-odbc php-pear php-xml php-xmlrpc php-mbstring php-snmp php-soap curl curl-devel
安装完成php后,确认重启Apache服务以便在Web浏览器中渲染PHP。
systemctl restart httpd.service
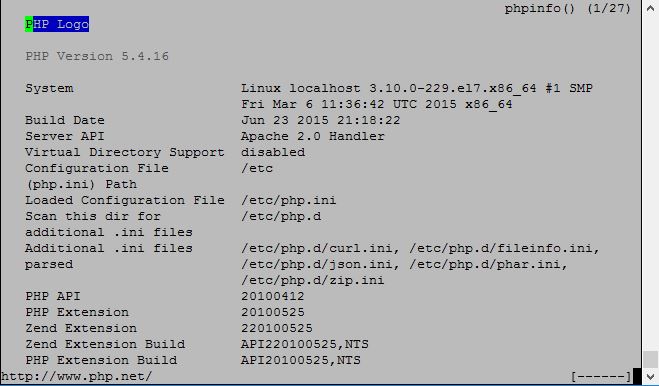
网站根目录创建phpinfo.php验证PHP。
vi /srv/www/test.com/info.php
编辑内容如下:
<?php
phpinfo();
?>
验证
links www.test.com/info.php
局域网内浏览器:
192.168.1.111/info.php
或者
www.test.com/info.php
输出:
安装使用EPEL安装源
yum install epel-release
安装phpmyadmin
yum install phpmyadmin
配置phpmyadmin,使phpmyadmin允许远程登陆
vi /etc/httpd/conf.d/phpMyAdmin.conf
内容如下
[...]
Alias /phpMyAdmin /usr/share/phpMyAdmin
Alias /phpmyadmin /usr/share/phpMyAdmin

//以下内容全部用#注释掉
#<Directory /usr/share/phpMyAdmin/>
#   AddDefaultCharset UTF-8
#   <IfModule mod_authz_core.c>
#
#     # Apache 2.4
#     <RequireAny>
#       Require ip 127.0.0.1
#       Require ip ::1
#     </RequireAny>
#   </IfModule>
#   <IfModule !mod_authz_core.c>
#     # Apache 2.2
#     Order Deny,Allow
#     Deny from All
#     Allow from 127.0.0.1
#     Allow from ::1
#   </IfModule>
#</Directory>

//以下内容新增加
<Directory /usr/share/phpMyAdmin/>
    Options none
    AllowOverride Limit
    Require all granted
</Directory>

[...]
更改Cookie身份验证方式为http
vi /etc/phpMyAdmin/config.inc.php
修改内容如下:
[...]
$cfg['Servers'][$i]['auth_type']     = 'http';    // Authentication method (config, http or cookie based)?  将cookie 改为http
[...]
重启apache
systemctl restart httpd.service
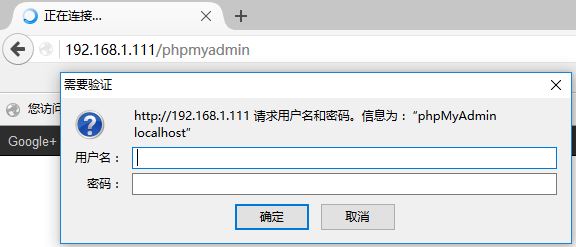
测试
局域网内浏览器:
192.168.1.111/phpmyadmin
或者
www.test.com/phpmyadmin
按提示填入账号密码:
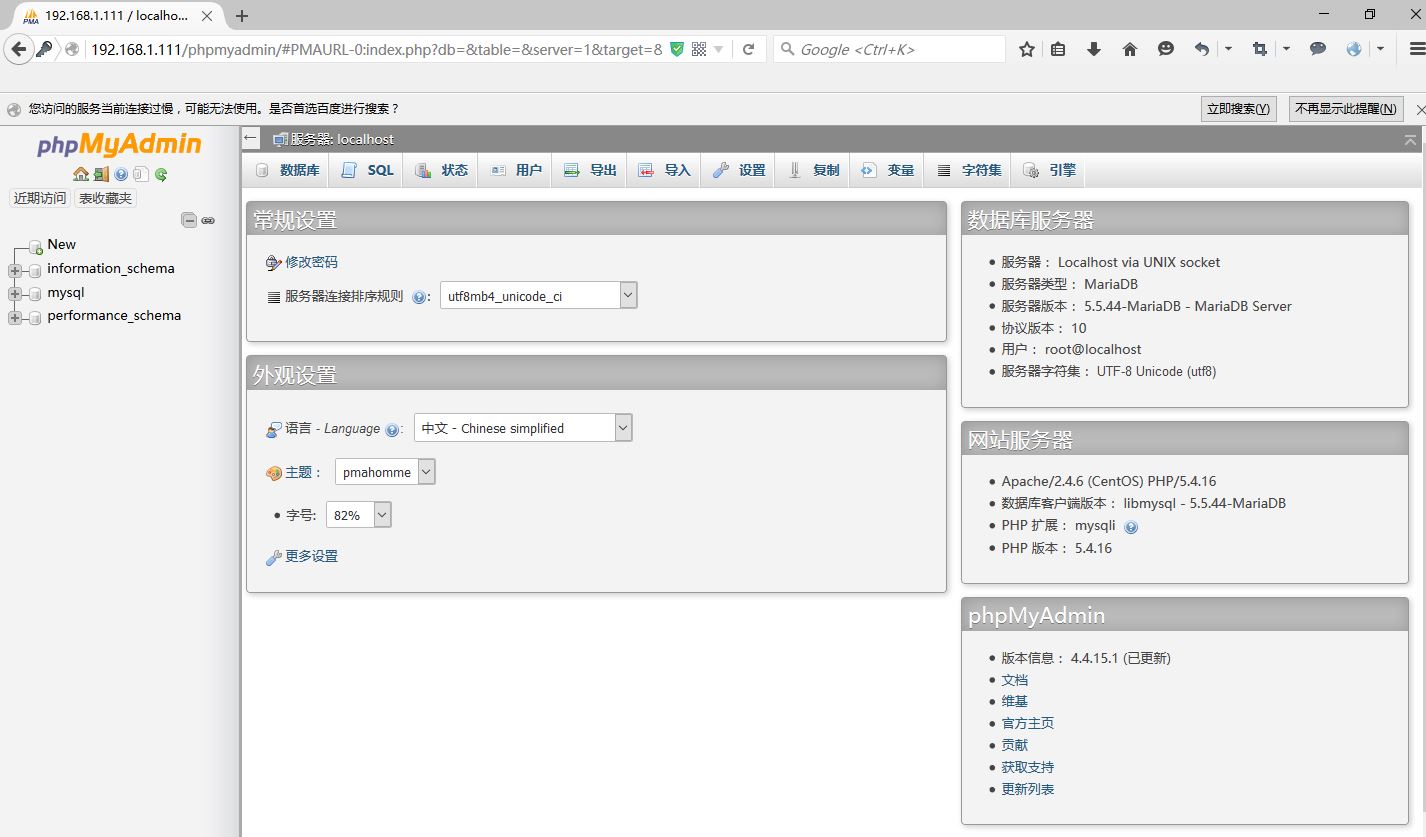
至此 LAMP配置完毕。
查询
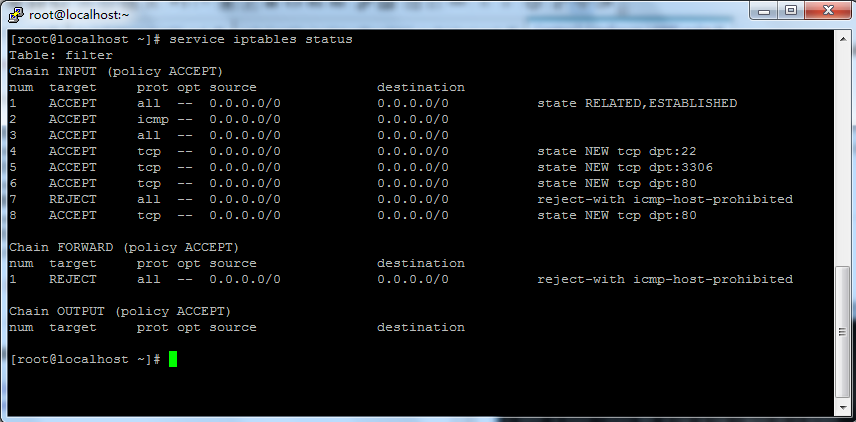
service iptables status
启动/关闭
service iptables start/stop
重启
service iptables restart
开机启用/关闭
chkconfig iptables on/off
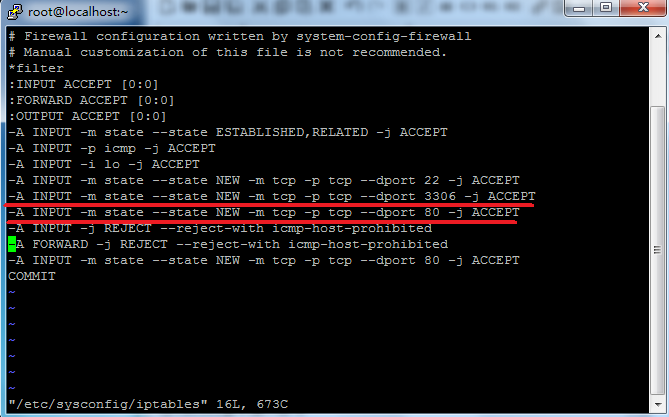
vi /etc/sysconfig/iptables
编辑如下(画红线的为新添加,即端口80及3306)
重启iptables
service iptables restart
从新查看防火墙状态
service iptables status
Virtualbox下Centos 7配置LAMP:Centos7配置LAMP
VPS Centos 6配置LAMP:VPS Centos 6配置LAMP
Virtualbox下Centos7配置LNMP:Centos7配置LNMP
VPS Centos 6配置LAMP:VPS Centos 6配置LNMP