相关教程:
SSPanel UIM 更换域名
魔改版再改版 ss-panel-v3-mod_Uim 前后端搭建
魔改版后端配置文件说明
魔改版单端口多用户教程
SSR 高级端口转发 伪装网站正常流量
ip检查tcpping 路由追踪 回程测试
配置文件路径:站点根目录/config/.config.php
首先开启
//邮箱验证 $System_Config[‘enable_email_verify’]=‘true’; //是否启用注册邮箱验证码
邮件发送方式 mailgun or smtp or sendgrid
mailgun没弄过,只讲 smtp 和 sendgrid
因 sendgrid 免费版每天100封故放弃,最终还是用了 smtp Gmail,虽然进垃圾箱,暂时没有好办法。
//邮件设置-----------------------------------------------------------------------
$System_Config['mailDriver'] = '这里选择方式';   // mailgun or smtp or sendgrid 选择发送邮件的方式

# mailgun
$System_Config['mailgun_key'] = '';
$System_Config['mailgun_domain'] = '';
$System_Config['mailgun_sender'] = '';

# smtp
$System_Config['smtp_host'] = 'smtp.gmail.com';
$System_Config['smtp_username'] = '[email protected]';
$System_Config['smtp_port'] = '465';
$System_Config['smtp_name'] = '[email protected]';
$System_Config['smtp_sender'] = '[email protected]';
$System_Config['smtp_passsword'] = '填邮箱密码';
$System_Config['smtp_ssl'] = 'true';

# sendgrid
$System_Config['sendgrid_key'] = '这里填写key';
$System_Config['sendgrid_sender'] = '[email protected]';
smtp说明
$System_Config['smtp_host'] = ''; //SMTP服务器地址

$System_Config['smtp_username'] = ''; //发信人邮件地址

$System_Config['smtp_port'] = ''; //SMTP服务器端口

$System_Config['smtp_name'] = ''; //发信人昵称

$System_Config['smtp_sender'] = ''; //发信人邮件地址

$System_Config['smtp_passsword'] = ''; //发信人邮箱登录密码/授权码

$System_Config['smtp_ssl'] = ''; //SMTP服务器SSL设置
另外如果用GMAIL需登录Google账户开启允许不安全应用;
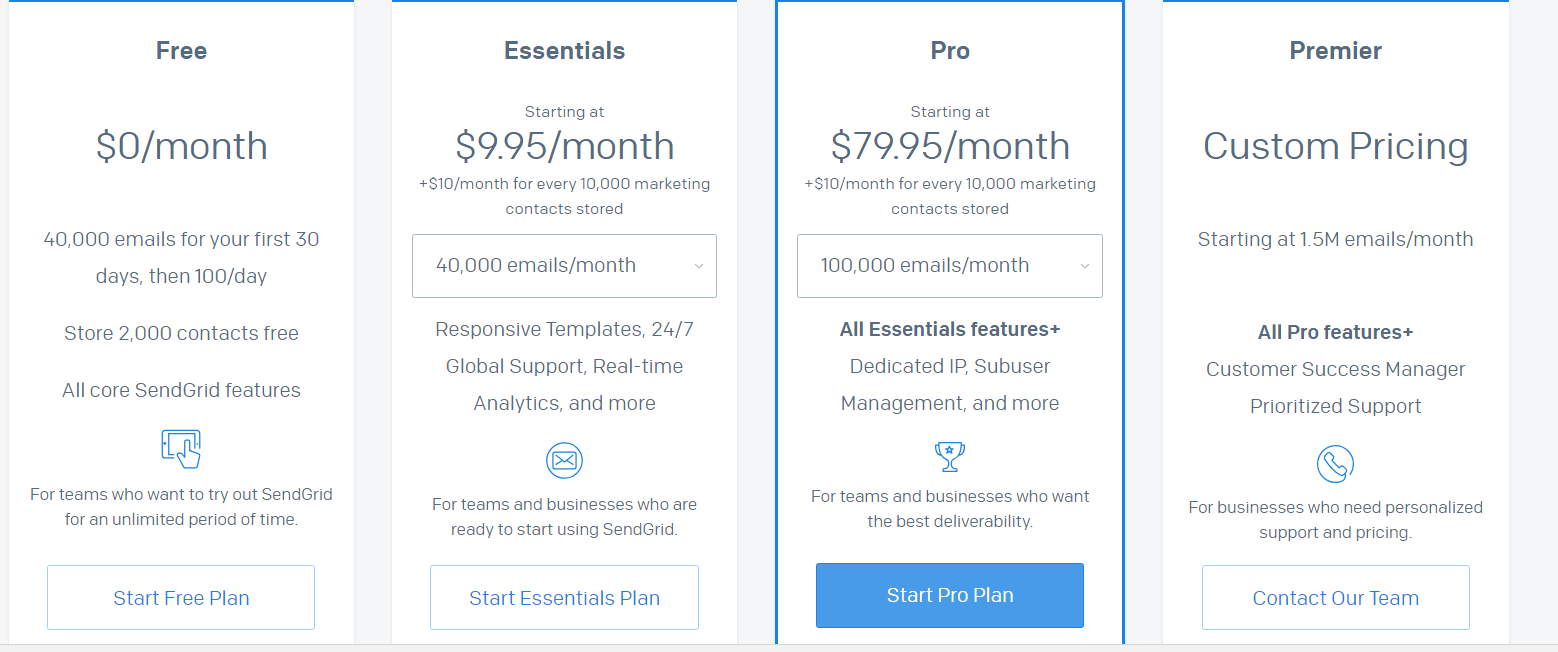
sendgrid说明
免费版:前30天4万封,之后每天100封,不够用啊
注册最好通过代理
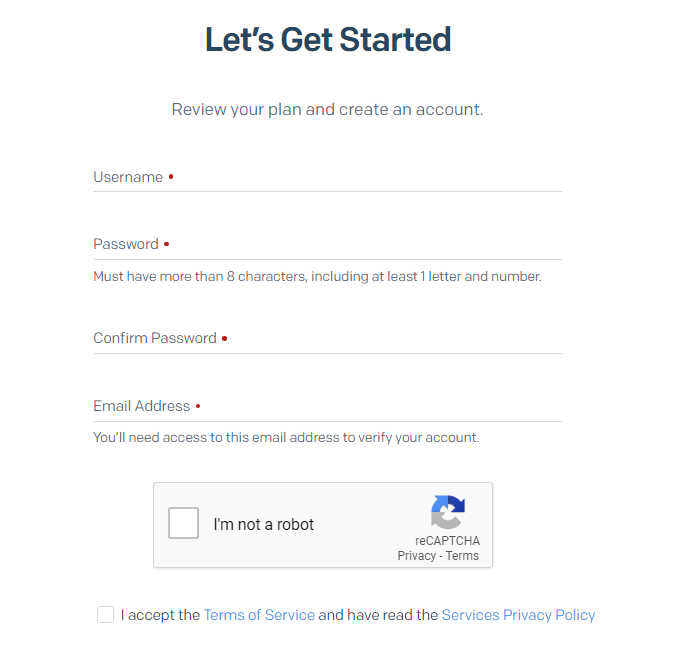
注册之后,验证一下邮件。
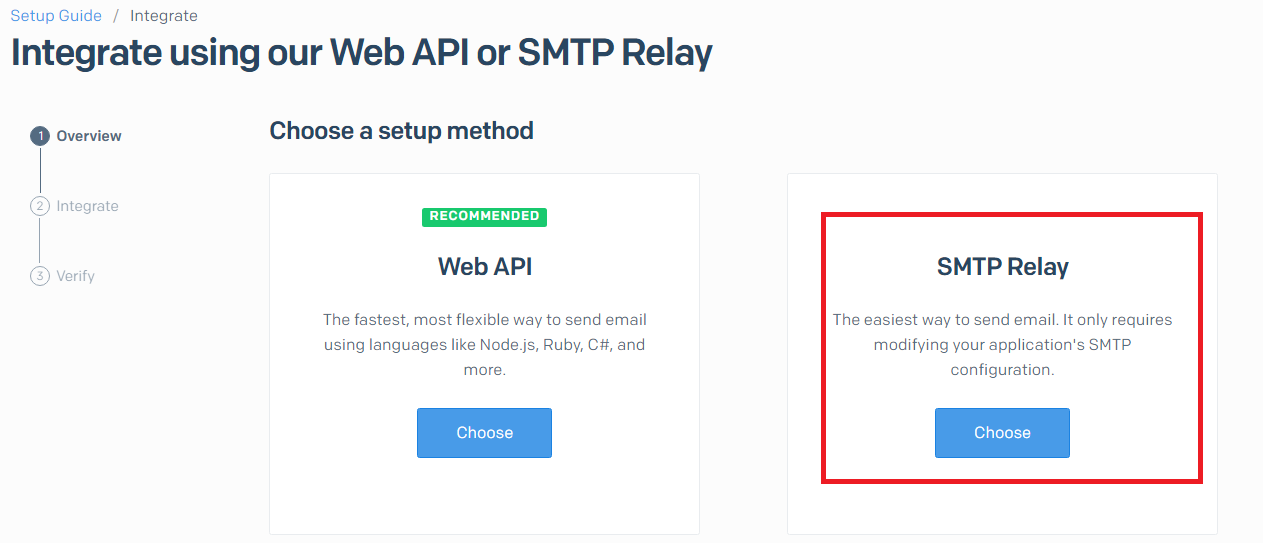
继续

SMTP Relay
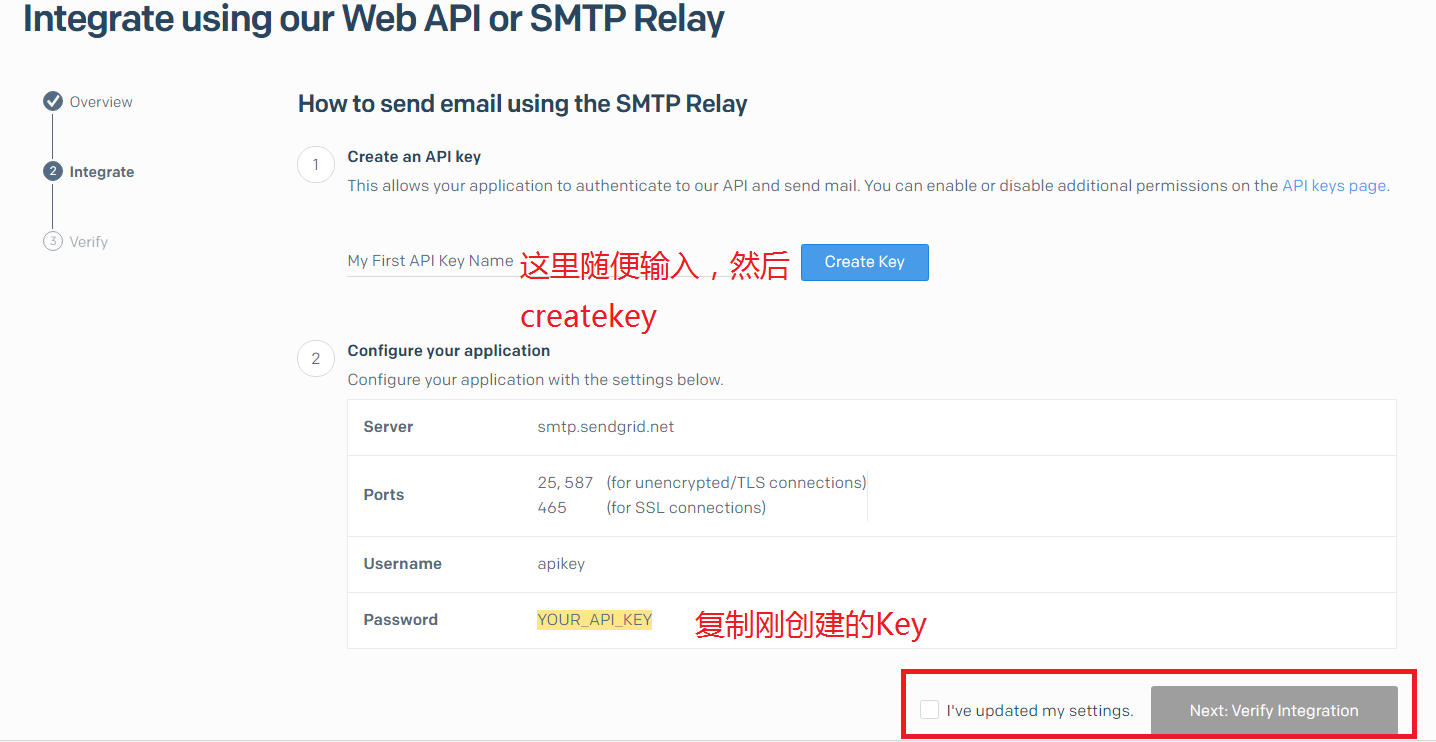
随意输入字符,创建API
复制API,这个API到前端配置文件去修改
# sendgrid
$System_Config['sendgrid_key'] = '这里填api';
$System_Config['sendgrid_sender'] = '这里填你的邮箱我的是:[email protected]';
回到sendgrid,勾选I’ve updated my settings ,进行下一步.
验证,成功。
mailgun说明(未测试)
smtp

$System_Config['smtp_host'] = 'smtp.mailgun.org';

$System_Config['smtp_username'] = 'mailgun smtp的邮箱';

$System_Config['smtp_port'] = '2525'; 必须得是2525其他都不可以!!!!

$System_Config['smtp_name'] = '就是你网站的名字吧';

$System_Config['smtp_sender'] = 'mailgun smtp的邮箱';

$System_Config['smtp_passsword'] = '你的mailgun Smtp 密码';

$System_Config['smtp_ssl'] = 'false'; 必须得是false不知道为什么感觉很怪
禁用 BT 防止版权争议
BitTorrent protocol
数据包明文匹配
禁止 百度高精度定位 防止IP与客户端地理位置被记录
(api|ps|sv|offnavi|newvector|ulog.imap|newloc)(.map|).(baidu|n.shifen).com
数据包明文匹配
禁止360有毒服务 屏蔽360
(.+.|^)(360|so).(cn|com)
数据包明文匹配
禁止 邮件滥发 防止垃圾邮件滥用
(Subject|HELO|SMTP)
数据包明文匹配
屏蔽轮子网站
(.*.||)(dafahao|minghui|dongtaiwang|epochtimes|ntdtv|falundafa|wujieliulan).(org|com|net)
数据包明文匹配
屏蔽 BT(2)
(torrent|.torrent|peer_id=|info_hash|get_peers|find_node|BitTorrent|announce_peer|announce.php\?passkey=)
数据包明文匹配
屏蔽Spam邮箱
(^.*\@)(guerrillamail|guerrillamailblock|sharklasers|grr|pokemail|spam4|bccto|chacuo|027168).(info|biz|com|de|net|org|me|la)
屏蔽迅雷
(.?)(xunlei|sandai|Thunder|XLLiveUD)(.)
数据包明文匹配
可基本屏蔽掉迅雷的网站,并且在全局模式下会影响迅雷的下载能力
屏蔽后显示的页面修改
如果您想自定义这个阻断页面的内容,请在每个后端目录下,复制 detect.html 为 user-detect.html 然后修改 user-detect.html ,重启后端即可自定义。
创建机器人 Bot Father
按照提示来就OK了
创建机器人
/newbot
机器人name及username
augustdoit
augustdoit_bot
创建成功,如图,留着token
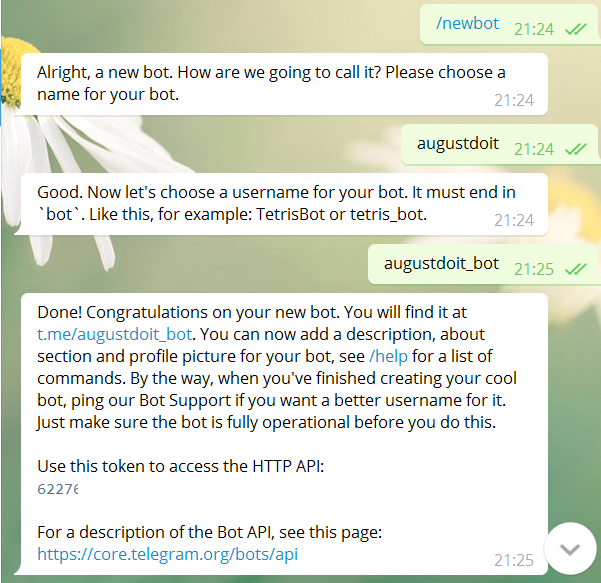
其他设置跟 BotFather 聊天就行了,包括 description about botpic 什么的。
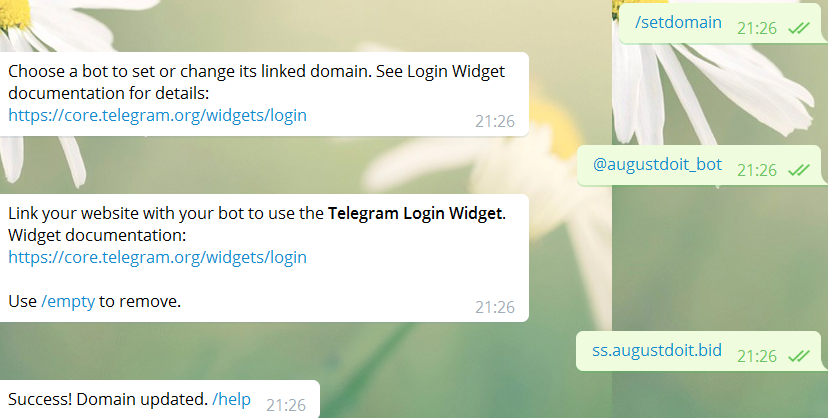
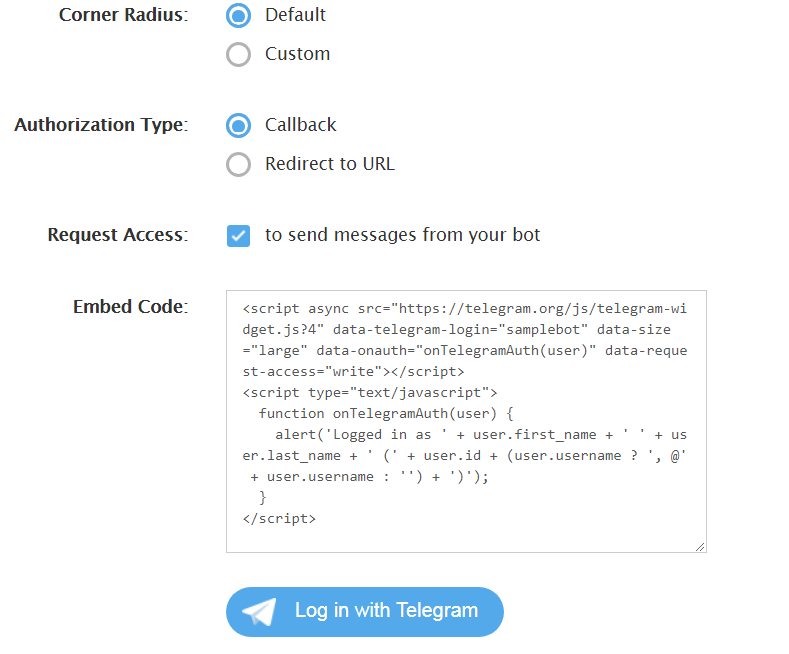
/setdomain
选择机器人,提交域名 ss.augustdoit.bid
打开提示的网页,并登录,在tele客户端那里授权登录

回到 BotFather 在 botsetting 里设置允许群组
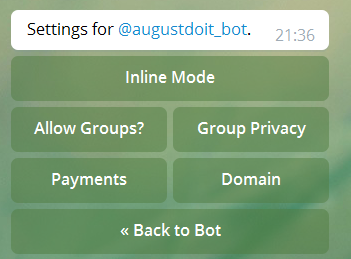
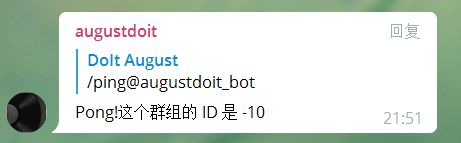
把机器人添加到群组,查询群组id
/ping@augustdoit_bot
修改前端配置文件
//Telegram bot设置--------------------------------------------------------------
$System_Config['enable_telegram']='true';      //是否开启Telegram bot
$System_Config['telegram_token']='××××××××';      //Telegram bot,bot 的 token ,跟 father bot 申请
$System_Config['telegram_chatid']='××××××××××';      //Telegram bot,群组会话 ID,把机器人拉进群里之后跟他 /ping 一下即可得到。
$System_Config['enable_tuling']='false';      //是否开启图灵机器人
$System_Config['tuling_apikey']='';      //图灵机器人API Key
$System_Config['tuling_apisecert']='';      //图灵机器人密钥
$System_Config['telegram_bot']='augustdoit_bot';      //Telegram 机器人账号
$System_Config['telegram_group_quiet']='false';      //Telegram 机器人在群组中不回应
$System_Config['telegram_qrcode']='zxing_local';      //二维码解码方式,online,phpzbar,zxing_online,zxing_local
$System_Config['telegram_request_token']='××××××××';      //Telegram 机器人请求Key,随意设置,由大小写英文和数字组成
                                                  //复杂一些,用于校验请求,更新这个
参数填好之后在网站根目录下执行
php xcat setTelegram
回到botfather 设置机器人命令
对应的前端配置文件 站点根目录/app/Utils/TelegramProcess.php
/setcommands
选择机器人 augustdoit_bot
输入内容
ping - 获取群组ID
chat - 唠嗑
traffic - 查询流量
checkin - 签到续命
help - 获取帮助信息
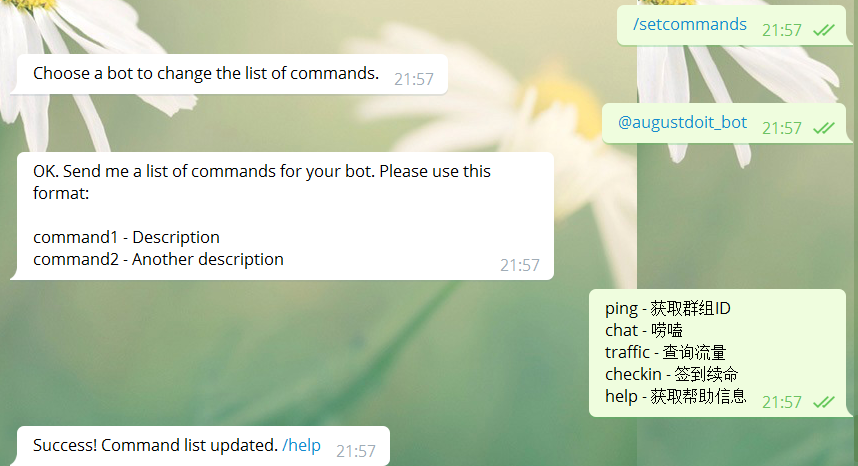
就OK了
站点根目录/app/Utils/Pay.php
删掉QQ支付和微信支付那两行就可以了
private static function codepay_html($user)
<button class="btn btn-flat waves-attach" id="btnSubmit" type="submit" name="type" value="1" ><img src="/images/alipay.jpg" width="50px" height="50px" /></button>
<button class="btn btn-flat waves-attach" id="btnSubmit" type="submit" name="type" value="2" ><img src="/images/qqpay.jpg" width="50px" height="50px" /></button>
<button class="btn btn-flat waves-attach" id="btnSubmit" type="submit" name="type" value="3" ><img src="/images/weixin.jpg" width="50px" height="50px" /></button>
站点根目录/resources/views/material
站点根目录/resources/views/material/user/
例如 首页简介 站点根目录/resources/views/material/index.tpl
<article id="1">
<h2 class="major">简介</h2>
<p>「ホワイトアルバムの季節」が、また、やってきた。</p></article>
直接替换文字就行了