 记录VPS(Centos7)安装配置LNMP创建虚拟主机(多站点)过程
环境
VPS 最小化安装 Centos 6
yum update

shutdown -r now
VPS reinstall 后默认安装apache,卸掉它
列出httpd相关程序包
rpm -qa|grep httpd
输出
httpd-2.2.15-47.el6.centos.i686
删除
rpm -e httpd --nodeps
在 http://nginx.org/packages/centos/6/noarch/RPMS/
查看最新库信息
rpm -Uvh http://nginx.org/packages/centos/6/noarch/RPMS/nginx-release-centos-6-0.el6.ngx.noarch.rpm
yum install nginx
vi /etc/nginx/nginx.conf
查找gzip,取消注释,修改为:
gzip on;
vi /etc/nginx/conf.d/default.conf
把server{}段全部注释掉,再添加如下内容(用于屏蔽80端口空主机头访问)
server {
    listen 80 default;
    return 500;
}
service nginx start
chkconfig nginx on
nginx主配置文件:/etc/nginx/nginx.conf
nginx默认配置文件目录:/etc/nginx/conf.d/
nginx默认站点主目录:/usr/share/nginx/html/
nginx默认日志目录:/var/log/nginx/
cd /etc/yum.repos.d
vi MariaDB.repo
输入内容如下:
# MariaDB 5.5 CentOS repository list - created 2015-12-12 10:13 UTC
# http://mariadb.org/mariadb/repositories/
[mariadb]
name = MariaDB
baseurl = http://yum.mariadb.org/5.5/centos6-x86
gpgkey=https://yum.mariadb.org/RPM-GPG-KEY-MariaDB
gpgcheck=1
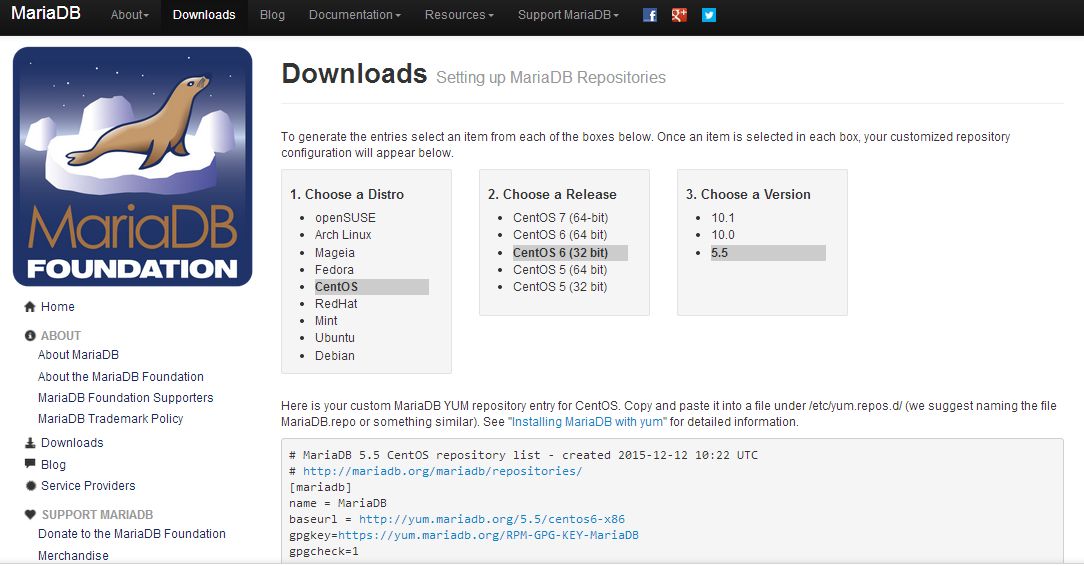
说明:以上输入内容从MariaDB官网下载页面获取,选择Centos版本以及需要安装的MariaDB版本后由官网给出,博主这里是Centos6 32位,MariaDB版本为5.5。
官网获取代码示意图:
yum install MariaDB-server MariaDB-client
service mysql start

chkconfig mysql on
mysql_secure_installation
这里需要配置 mysql 根用户和密码、清除其他用户、清除不需要的数据库等。输出类似于下面的执行过程,其中需要我们从键盘输入的内容已注释:
# /usr/bin/mysql_secure_installation
/usr/bin/mysql_secure_installation: line 379: find_mysql_client: command not found

NOTE: RUNNING ALL PARTS OF THIS SCRIPT IS RECOMMENDED FOR ALL MariaDB
SERVERS IN PRODUCTION USE! PLEASE READ EACH STEP CAREFULLY!

In order to log into MariaDB to secure it, we'll need the current
password for the root user. If you've just installed MariaDB, and
you haven't set the root password yet, the password will be blank,
so you should just press enter here.

Enter current password for root (enter for none):   //这里直接回车,这里可不是 Linux root 用户,而是 MariaDB 数据库的 root 用户
OK, successfully used password, moving on...

Setting the root password ensures that nobody can log into the MariaDB
root user without the proper authorisation.

Set root password? [Y/n] y
New password:                //输入你的数据库root用户密码
Re-enter new password:       //再输入一遍
Password updated successfully!
Reloading privilege tables..
... Success!
By default, a MariaDB installation has an anonymous user, allowing anyone
to log into MariaDB without having to have a user account created for
them. This is intended only for testing, and to make the installation
go a bit smoother. You should remove them before moving into a
production environment.

Remove anonymous users? [Y/n] y
... Success!

Normally, root should only be allowed to connect from 'localhost'. This
ensures that someone cannot guess at the root password from the network.

Disallow root login remotely? [Y/n] y
... Success!

By default, MariaDB comes with a database named 'test' that anyone can
access. This is also intended only for testing, and should be removed
before moving into a production environment.

Remove test database and access to it? [Y/n] y
- Dropping test database...
... Success!
- Removing privileges on test database...
... Success!

Reloading the privilege tables will ensure that all changes made so far
will take effect immediately.

Reload privilege tables now? [Y/n] y
... Success!

Cleaning up...

All done! If you've completed all of the above steps, your MariaDB
installation should now be secure.

Thanks for using MariaDB!
然后使用 MySQL 的 root 帐户(不同于 Linux 的 root 帐户,刚才设置密码了)登录进去
mysql -u root -p
输入密码后回车,下面是输出示例,可以看到命令提示符变为 MariaDB [(none)]>
# mysql -u root -p
Enter password:
Welcome to the MariaDB monitor. Commands end with ; or \g.
Your MariaDB connection id is 10
Server version: 5.5.47-MariaDB MariaDB Server

Copyright (c) 2000, 2015, Oracle, Monty Program Ab and others.

Type 'help;' or '\h' for help. Type '\c' to clear the current input statement.

MariaDB [(none)]>
按提示输入root密码,就会进入MariaDB的交互界面,说明已经安装成功。
yum -y install php-fpm php-cli php-mysql php-gd php-ldap php-odbc php-pdo php-pecl-memcache php-pear php-xml php-xmlrpc php-mbstring php-snmp php-soap
pecl install apc后会出现配置提示,所有选择项全部输入回车
yum -y install php-devel
yum -y groupinstall 'Development Tools'
pecl channel-update pecl.php.net
pecl install apc
说明:APC服务用于加速php
另外安装apc若报错
make: *** [apc.lo] Error 1
需安装
yum install pcre-devel
后从新
pecl install apc
成功后输出的最后几行如下:

vi /etc/php.ini
查找expose_php,修改为以下内容(隐藏php版本号):
expose_php = Off
查找cgi.fix_pathinfo和date.timezone,修改为以下内容:
cgi.fix_pathinfo = 0
date.timezone = "Asia/Hong_Kong"
查找Dynamic Extensions,在该配置区块插入以下内容:
extension=apc.so
vi /etc/php-fpm.d/www.conf
查找listen = 127.0.0.1:9000,修改为以下内容
listen = /var/run/php-fpm/php-fpm.sock
查找user = apache,修改为以下内容
user = nginx
查找group = apache,修改为以下内容
group = nginx
chkconfig  php-fpm on
service  php-fpm start
mkdir -p /srv/www/blog
mkdir -p /srv/www/log
mkdir -p /srv/www/tmp/session
useradd -d '/srv/www' -s /sbin/nologin wanglaodao
passwd wanglaodao   //设置密码
usermod -G nginx wanglaodao
chown -R wanglaodao:nginx /srv/www
vi /etc/nginx/conf.d/blog.conf
输入以下内容:
server {
 listen 80;
 server_name blog.wanglaodao.com;
 access_log /srv/www/log/access.log;
 error_log /srv/www/log/error.log;
 root /srv/www/blog;
 index index.php index.html index.htm;
 location = /favicon.ico {
 log_not_found off;
 access_log off;
 }
 location = /robots.txt {
 allow all;
 log_not_found off;
 access_log off;
 }

 #error_page 404 /404.html;

 # redirect server error pages to the static page /50x.html
 #
 error_page 500 502 503 504 /50x.html;
 location = /50x.html {
 root /usr/share/nginx/html;
 }

 # pass the PHP scripts to FastCGI server listening on sock
 #
 location ~ \.php$ {
 try_files $uri =404;
 fastcgi_pass unix:/var/run/php-fpm/wanglaodao.sock;
 fastcgi_index index.php;
 fastcgi_param SCRIPT_FILENAME $document_root$fastcgi_script_name;
 include fastcgi_params;
 }

 # Deny all attempts to access hidden files such as .htaccess
 # Deny access to any files with a .php extension in the uploads directory
 #
 location ~ /\. {
 deny all;
 }
 location ~* /(?:uploads|files)/.*\.php$ {
 deny all;
 }

 location ~* \.(gif|jpg|jpeg|png|bmp|txt|zip|jar|swf)$ {
 expires 30d;
 access_log off;
 valid_referers none blocked *.wanglaodao.com  server_names ~\.google\. ~\.baidu\. ~\.bing\. ~\.yahoo\. ~\.soso\. ~\.sogou\. ~\.alexa\. ~\.haosou\. ~\.youdao\.;
 if ($invalid_referer) {
 #return 403;
 rewrite ^/ http://blog.wanglaodao.com/403.png;
  }
 }
 rewrite ^/sitemap.xml$ /sitemap.php last;
}
说明:监听80端口,自定义日志文件存放位置,对favicon.ico和robots.txt的访问及错误不写入日志,启用php-fpm支持且使用wanglaodao.sock套接字通信,屏蔽对.开头的隐藏文件的访问(比如.htaccess),屏蔽对uploads和files目录下php文件的访问(通常是上传文件存放目录),图片防盗链,访问sitemap.xml文件改写为访问sitemap.php。
测试nginx配置文件是否正确
nginx -t
输出如下:
nginx: the configuration file /etc/nginx/nginx.conf syntax is ok

nginx: configuration file /etc/nginx/nginx.conf test is successful
vi /etc/php-fpm.d/blog.conf
输入如下内容
[blog]
listen = /var/run/php-fpm/wanglaodao.sock
listen.allowed_clients = 127.0.0.1
listen.owner = wanglaodao
listen.group = nginx
listen.mode = 0660

user = wanglaodao
group = nginx

pm = dynamic
pm.max_children = 50
pm.start_servers = 5
pm.min_spare_servers = 5
pm.max_spare_servers = 35

chdir = /
slowlog = /var/log/php-fpm/www-slow.log
php_value[session.save_handler] = files
php_value[session.save_path] = /srv/www/tmp/session
php_admin_value[open_basedir] = /srv/www/blog:/srv/www/tmp:/usr/share/php:/tmp
php_admin_value[upload_tmp_dir] = /srv/www/tmp
vi /etc/logrotate.d/blog
输入以下内容
/srv/www/log/*.log {
daily
missingok
rotate 7
compress
delaycompress
notifempty
create 640 nginx adm
sharedscripts
postrotate
 [ -f /var/run/nginx.pid ] && kill -USR1 `cat /var/run/nginx.pid`
endscript
}
service nginx restart
service  php-fpm restart
yum install epel-release
yum install phpmyadmin
vi /etc/nginx/conf.d/phpmyadmin.conf
输入以下内容
server {
 listen 80;
 server_name phpmyadmin.wanglaodao.com;
 root /usr/share/phpMyAdmin;
 index index.php index.html index.htm;
 location = /favicon.ico {
 log_not_found off;
 access_log off;
 }
 location = /robots.txt {
 allow all;
 log_not_found off;
 access_log off;
 }

 #error_page 404 /404.html;

 # redirect server error pages to the static page /50x.html
 #
 error_page 500 502 503 504 /50x.html;
 location = /50x.html {
 root /usr/share/nginx/html;
 }

 # pass the PHP scripts to FastCGI server listening on sock
 #
 location ~ \.php$ {
 try_files $uri =404;
 fastcgi_pass unix:/var/run/php-fpm/php-fpm.sock;
 fastcgi_index index.php;
 fastcgi_param SCRIPT_FILENAME $document_root$fastcgi_script_name;
 include fastcgi_params;
 }

 # Deny all attempts to access hidden files such as .htaccess
 # Deny access to any files with a .php extension in the uploads directory
 #
 location ~ /\. {
 deny all;
 }
 location ~* /(?:uploads|files)/.*\.php$ {
 deny all;
 }
}
创建session目录,添加Nginx权限,重启php-fpm:
mkdir -p /var/lib/php/session
chown -R nginx:nginx /var/lib/php/session
service php-fpm restart
首次登陆phpmyadmin提示
設定檔案需要設定一組加密密碼 (blowfish_secret)。
修改phpMyAdmin配置文件:
vi /usr/share/phpMyAdmin/libraries/config.default.php
查找
$cfg[‘blowfish_secret’]
修改为
$cfg[‘blowfish_secret’] = ‘wanglaodao’;
service nginx restart
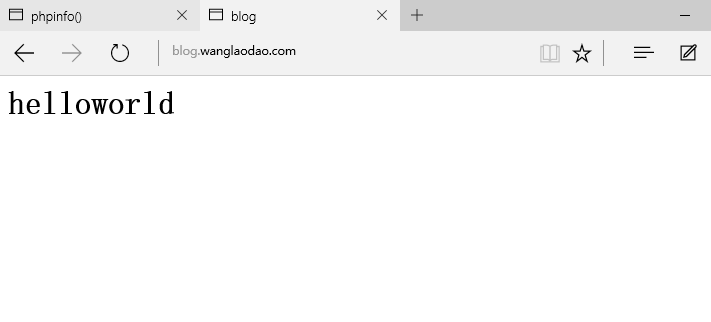
创建首页文件
vi /srv/www/blog/index.html
输入
<title>blog</title>
<h1>hello world</h1>
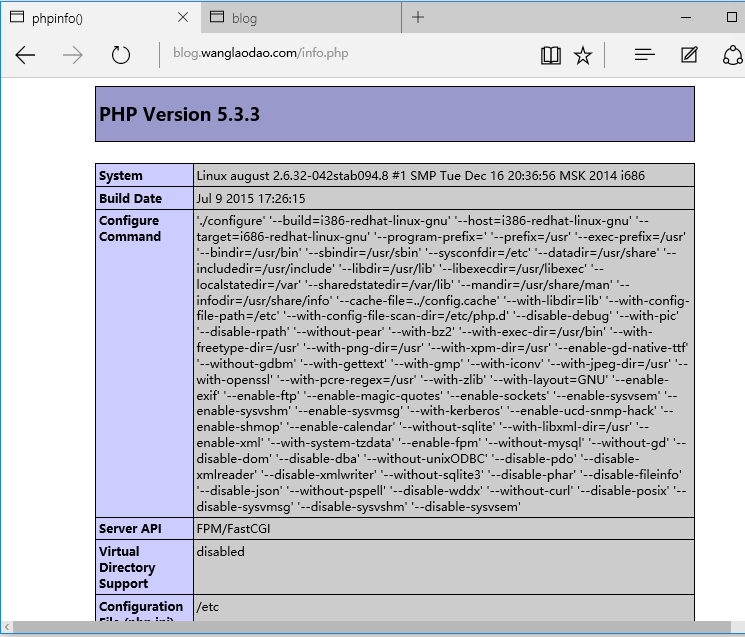
创建info.php
vi /srv/www/blog/info.php
输入
<?php
phpinfo();
?>
首页:
phpinfo页
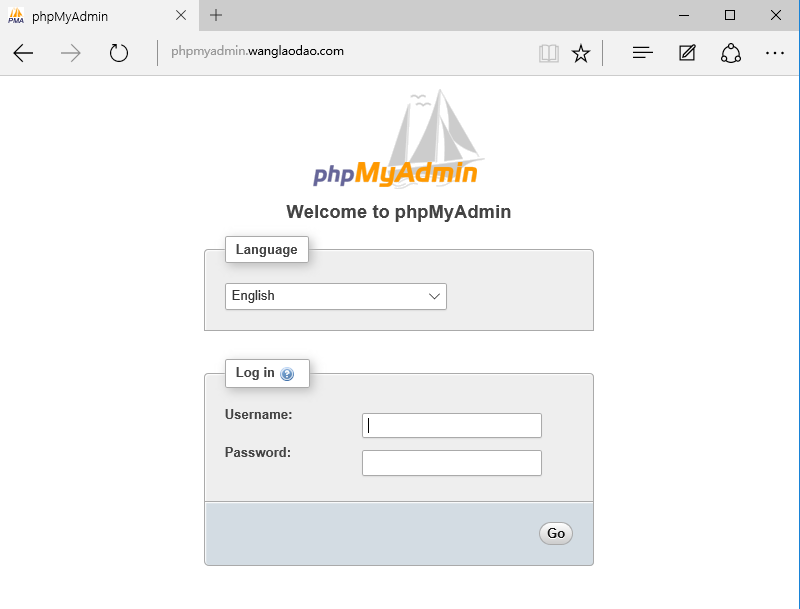
phpmyadmin页
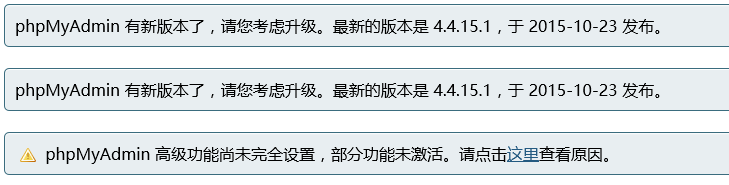
点击查看原因后显示:
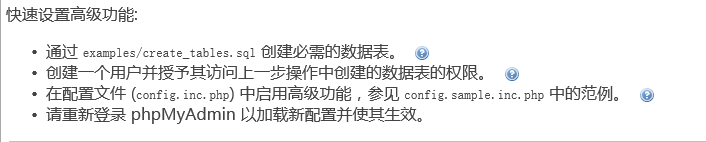
根据提示解决办法如下:
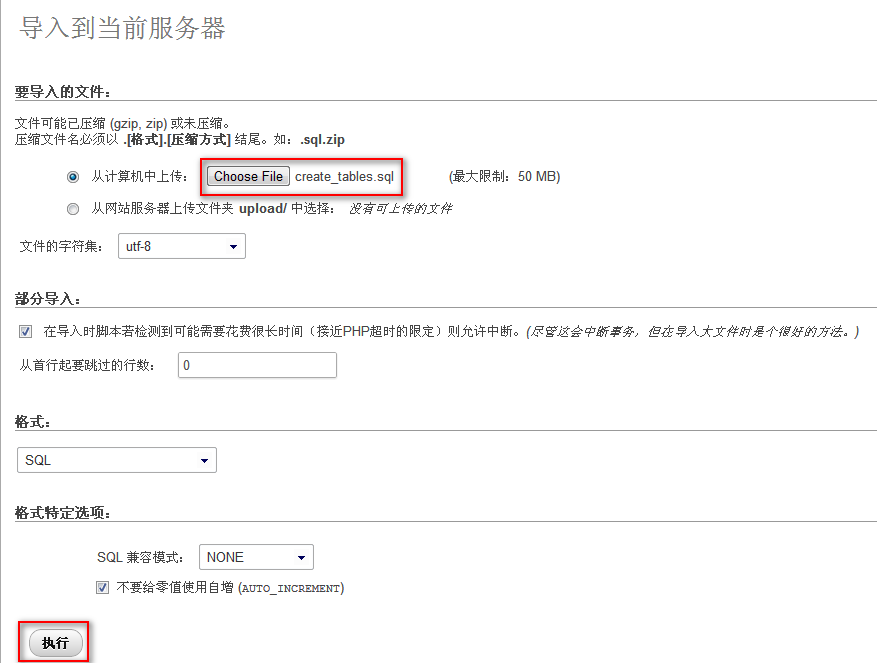
通过examples/create_tables.sql创建表
这个文件所在目录为:
/usr/share/doc/phpMyAdmin-4.0.10.11/examples/create_tables.sql
利用winscp将其下载到本地
浏览器打开:phpmyadmin.wanglaodao.com
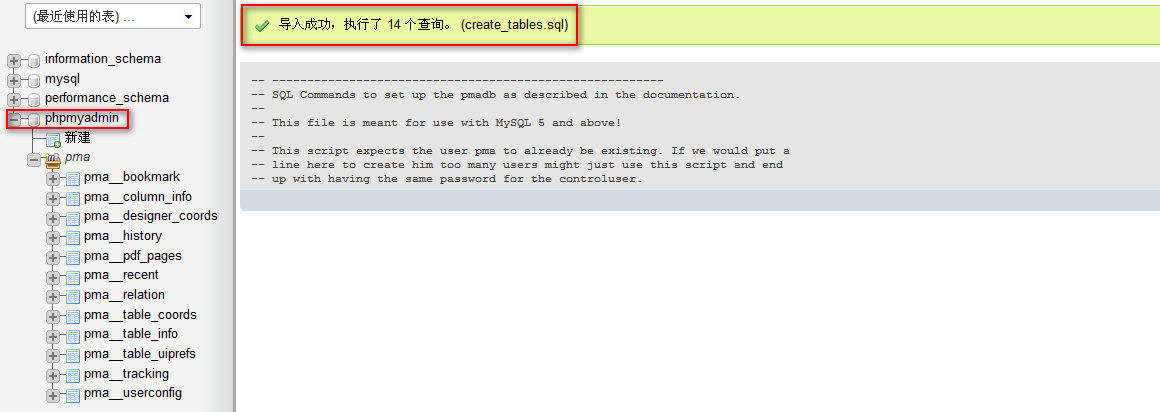
root 用户登录 phpMyAdmin 后,在“导入”页面,上传这个 create_tables.sql 文件即可成功创建数据库phpmyadmin。
创建完数据库 phpmyadmin 后,展开左侧phpmyadmin,出现12张表名。
更改配置文件中参数
vi /usr/share/phpMyAdmin/libraries/config.default.php
当然也可以下载到本地修改后再上传。
修改如下字段
$cfg['Servers'][$i]['pmadb'] = 'phpmyadmin';
$cfg['Servers'][$i]['bookmarktable'] = 'pma__bookmark';
$cfg['Servers'][$i]['relation'] = 'pma__relation';
$cfg['Servers'][$i]['table_info'] = 'pma__table_info';
$cfg['Servers'][$i]['table_coords'] = 'pma__table_coords';
$cfg['Servers'][$i]['pdf_pages'] = 'pma__pdf_pages';
$cfg['Servers'][$i]['column_info'] = 'pma__column_info';
$cfg['Servers'][$i]['history'] = 'pma__history';
$cfg['Servers'][$i]['tracking'] = 'pma__tracking';
$cfg['Servers'][$i]['designer_coords'] = 'pma__designer_coords';
$cfg['Servers'][$i]['userconfig'] = 'pma__userconfig';
$cfg['Servers'][$i]['recent'] = 'pma__recent';
$cfg['Servers'][$i]['table_uiprefs'] = 'pma__table_uiprefs';
修改完成后浏览器重新登录 phpMyAdmin 以加载新配置并使其生效。
至此 VPS上LNMP搭建完毕。
Virtualbox下Centos 7配置LAMP:Centos7配置LAMP
VPS Centos 6配置LAMP:VPS Centos 6配置LAMP
Virtualbox下Centos7配置LNMP:Centos7配置LNMP